在Hive三种安装方式和搭建中介绍了metastore服务端的安装,但是这个服务端不能够直接为客户端提供链接,在Hive中提供了hiveserver2的服务用于客户端链接,包括hive客户端工具,JDBC等。
hive-site.xml
<configuration>
<!-- WARNING!!! This file is auto generated for documentation purposes ONLY! -->
<!-- WARNING!!! Any changes you make to this file will be ignored by Hive. -->
<!-- WARNING!!! You must make your changes in hive-site.xml instead. -->
<!-- Hive Execution Parameters -->
<property>
<name>hive.metastore.warehouse.dir</name>
<value>/opt/apps/hive/apache-hive-2.3.9/warehouse</value>
</property>
<property>
<name>hive.metastore.local</name>
<value>false</value>
</property>
<property>
<name>javax.jdo.option.ConnectionDriverName</name>
<value>com.mysql.cj.jdbc.Driver</value>
</property>
<property>
<name>javax.jdo.option.ConnectionURL</name>
<value>jdbc:mysql://192.168.56.102:3306/hive?createDatabaseIfNotExist=true&allowPublicKeyRetrieval=true</value>
</property>
<property>
<name>javax.jdo.option.ConnectionUserName</name>
<value>root</value>
</property>
<property>
<name>javax.jdo.option.ConnectionPassword</name>
<value>123456</value>
</property>
<property>
<name>hive.server2.thrift.port</name>
<value>10000</value>
</property>
<property>
<name>hive.server2.thrift.host</name>
<value>0.0.0.0</value>
</property>
<property>
<name>hive.server2.authentication</name>
<value>CUSTOM</value>
</property>
<property>
<name>hive.server2.custom.authentication.class</name>
<value>org.hadoop.hive.learn.PasswordAuthenticationProvider</value>
</property>
<property>
<name>hive.server2.custom.authentication.file</name>
<value>/opt/apps/hive/apache-hive-2.3.9/conf/passwd</value>
</property>
<property>
<name>hive.server2.enable.doAs</name>
<value>false</value>
</property>
</configuration>
Hive在连接的时候可以设置授权信息,但是官方提供的Setting Up HiveServer2 – Apache Hive – Apache Software Foundation集中方式中,我没有LDAP或者KERBEROS,因此我使用了CUSTOM的方式,自己实现了一个简单的授权工具。
在以上的配置中,有
hive.server2.enable.doAs的配置,该配置默认是true, 这个配置表明是否按照Hive登录的用户去操作hadoop, 如果为true的话,则需要登录的用户在hadoop中也存在,否则将会抛出org.apache.hadoop.ipc.RemoteException:User: xxx is not allowed to impersonate root.
server2的高可用配置
<property>
    <name>hive.server2.dynamic.service.discovery</name>
    <value>true</value>
</property>
<property>
    <name>hive.server2.zookeeper.namespace</name>
    <value>hiveserver2_zk</value>
</property>
<property>
    <name>hive.zookeeper.quorum</name>
    <value>node1:2181,node2:2181,node3:2181</value>
</property>
<property>
    <name>hive.zookeeper.client.port</name>
    <value>2181</value>
</property>
<property>
    <name>hive.server2.thrift.bind.host</name>
    <value>node2</value>
</property>
<property>
    <name>hive.server2.thrift.port</name>
    <value>10001</value>
</property>
在集群中的访问方式为:
jdbc:hive2://node1,node2,node3/mydb;serviceDiscoveryMode=zookeeper;zooKeeperNamespace=hiveserver2_zk
授权实现
package org.hadoop.hive.learn;

import org.apache.hadoop.hive.conf.HiveConf;
import org.apache.hive.service.auth.PasswdAuthenticationProvider;
import org.slf4j.Logger;
import org.slf4j.LoggerFactory;

import javax.security.sasl.AuthenticationException;
import java.io.BufferedReader;
import java.io.FileReader;
import java.util.HashMap;
import java.util.Map;

public class PasswordAuthenticationProvider implements PasswdAuthenticationProvider {

    private final HiveConf hiveConf;
    private final static String DEFAULT_PASSWD_PATH = "/opt/apps/passwd";
    private final String filePath;

    private static final Logger LOG = LoggerFactory.getLogger(PasswordAuthenticationProvider.class);

    private Map<String, String> userPwdMap = new HashMap<String, String>();

    public PasswordAuthenticationProvider(HiveConf hiveConf) {
        this.hiveConf = hiveConf;
        String filePath = this.hiveConf.get("hive.server2.custom.authentication.file");
        this.filePath = filePath == null ? DEFAULT_PASSWD_PATH : filePath;

        init();
    }

    private void init() {
        try(BufferedReader reader = new BufferedReader(new FileReader(filePath))) {
            String line = "";
            while ((line = reader.readLine()) != null) {
                line = line.trim();
                String[] splits = line.split(":");
                userPwdMap.put(splits[0], splits[1]);
            }
        } catch (Exception e) {
            LOG.error("初始化失败: {}", e.getMessage(), e);
            throw new RuntimeException(e);
        }

       LOG.info("数据初始化完成");
    }


    @Override
    public void Authenticate(String s, String s1) throws AuthenticationException {
        String pwd = userPwdMap.get(s);
        if (pwd != null && !"".equals(s1.trim())) {
            return;
        }

        throw new AuthenticationException("用户名或密码错误");
    }
}
这个实现很简单,没有复杂的点,就是在文件中按照
user:pwd的方式存储,然后在初始化的时候将信息放入到map, 然后匹配用户名和密码即可。在完成开发之后,则可以将该类打包成jar包,放在
HIVE_HOME/lib目录下,在hive.server2.custom.authentication.class中配置自己的授权类即可。
启动hiveserver2
启动hiveserver2可以通过两个命令来实现:
hiveserver2


# 或者通过hive命令启动
hive --service hiveserver2
hiveserver2默认的监听端口为10000,可以通过
netstat -ntlp | grep 10000查看端口的监听情况
连接hiveserver2
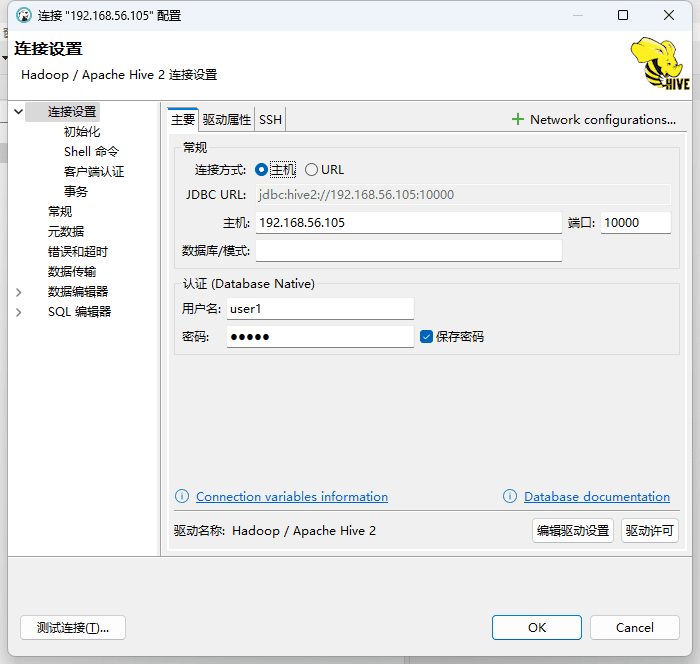
在启动完成hiveserver2的任务之后,则可以通过客户端工具链接了:
则最终链接的效果如下:
到这里,hiveserver2配置完成。


